Inception — The Complete Guide
A practical, beginner-friendly guide to the 42 school Inception project. Whether you're just starting out or stuck mid-way, this guide walks you through every concept, every phase, and every common error — step by step.
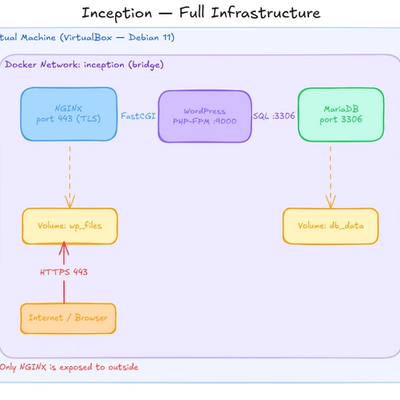
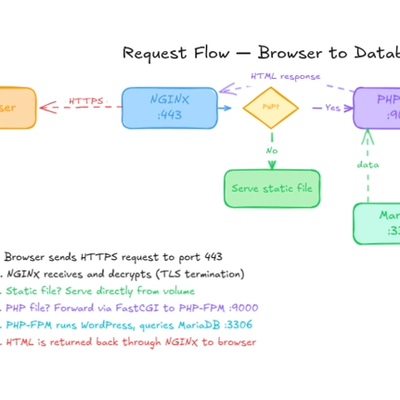
Table of Contents
- What is Inception?
- Pre-Knowledge — Concepts You Must Understand First
- Phase 0 — Do Everything Manually First
- Phase 1 — Your First Container (MariaDB)
- Phase 2 — Add WordPress + PHP-FPM
- Phase 3 — Add NGINX + TLS
- Phase 4 — Wire Everything with Docker Compose
- Phase 5 — Make It Subject Compliant
- Common Errors & Fixes
- Final Checklist
- Useful Links
1. What is Inception?
Inception is a 42 school project where you build a small but complete web infrastructure entirely using Docker containers, running inside a Virtual Machine.
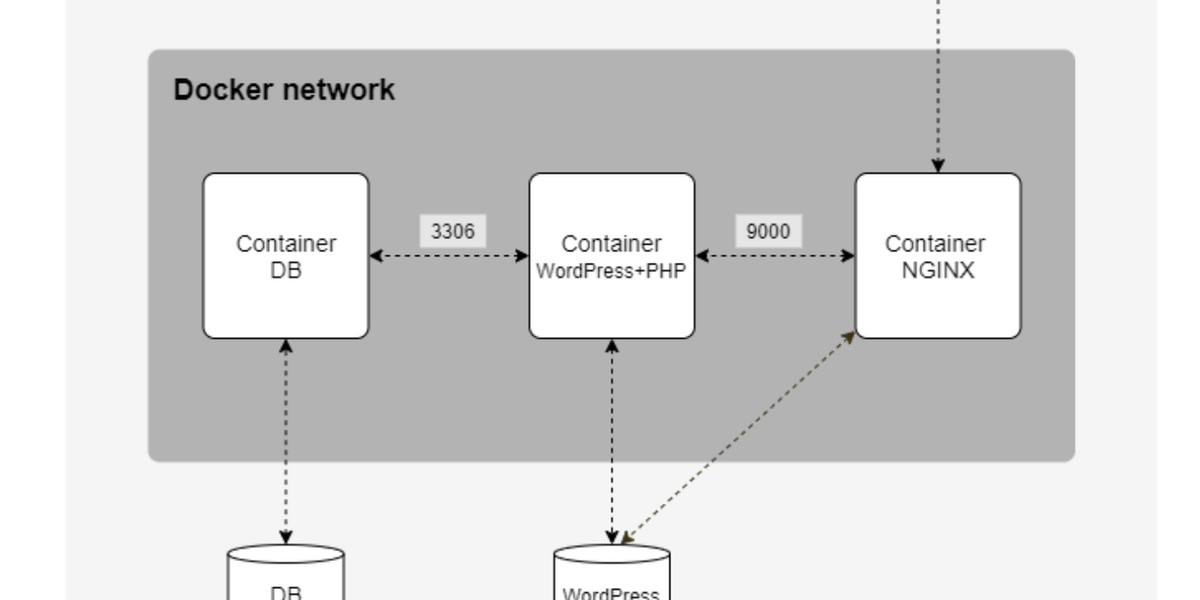
The goal is to understand how modern web applications are deployed using containerization. You will create and wire together three services:
- NGINX — the web server and reverse proxy (the only door to the outside world)
- WordPress + PHP-FPM — the web application
- MariaDB — the database that stores all WordPress content
Each service runs in its own isolated container. They communicate through a private Docker network. Everything is defined in a single docker-compose.yml file and starts with one make command.
VM (VirtualBox)
└── Docker Network: inception
├── NGINX container ← only exposed to internet (port 443)
├── WordPress container ← talks to both NGINX and MariaDB
└── MariaDB container ← only reachable from WordPress
Think of it as building your own mini data center, from scratch, on your machine.
2. Pre-Knowledge
Before writing a single line of code, you need to understand these concepts. Don't skip this — it will save you hours of confusion.
Virtual Machines vs Containers
A Virtual Machine (VM) emulates an entire computer, including its own OS. It runs on a hypervisor like VirtualBox. VMs are heavy — gigabytes of disk space and RAM just for the OS.
A container shares the host machine's OS kernel but isolates the application in its own filesystem and network. It only packages the application and its dependencies. Containers are:
- Lightweight (megabytes, not gigabytes)
- Fast to start (seconds, not minutes)
- Reproducible across any machine
In Inception: your VM is the house. Your containers are the rooms inside it.
Docker Core Concepts
Image — a read-only blueprint for a container. Built from a Dockerfile. Layered: each instruction adds a layer on top of the last.
Container — a running instance of an image. When you start a container, Docker adds a thin writable layer on top of the image, sets up an isolated network and filesystem, and runs your command.
Dockerfile — a text file with instructions to build an image:
FROM debian:bullseye
RUN apt-get update && apt-get install -y nginx
COPY conf/nginx.conf /etc/nginx/nginx.conf
EXPOSE 443
CMD ["nginx", "-g", "daemon off;"]
Docker Compose — a tool to define and run multi-container apps from a single docker-compose.yml file. Replaces running many docker run commands manually.
Network — connects containers so they can talk to each other by service name. When two containers are on the same bridge network, Docker acts as a mini DNS: the container named mariadb is reachable at the hostname mariadb.
Volume — persistent storage that survives container restarts. Without a volume, all data is lost when a container is removed.
Key Docker Commands
Command
What it does
docker build -t myimage .
Build an image from Dockerfile
docker run -it myimage
Run a container interactively
docker run -d myimage
Run in background (detached)
docker ps
List running containers
docker exec -it <id> bash
Open a shell inside a container
docker logs <id>
View container logs
docker stop <id>
Stop a container
docker rm <id>
Remove a stopped container
docker volume ls
List all volumes
docker network inspect <name>
Inspect a network
Why service mysql start Fails in Docker
Inside a Docker container there is no systemd. Commands like service mysql start or systemctl start mysql rely on systemd to manage processes. Containers are too minimal to run systemd by default.
So you start services directly using their binary:
mysqld_safe & # starts MariaDB directly
php-fpm7.4 -F # starts PHP-FPM directly in foreground
nginx -g "daemon off;" # starts NGINX in foreground
The & runs the process in the background. wait at the end keeps the script alive and monitors the background process — if MariaDB crashes, the container stops too (correct behavior). Using tail -f /dev/null instead keeps the container alive even if the service crashes, which hides problems.
The Security Model (Why Only NGINX Has an Exposed Port)
Internet → can only reach → NGINX (port 443)
NGINX → can only reach → WordPress (port 9000, internal network)
WordPress→ can only reach → MariaDB (port 3306, internal network)
MariaDB → not reachable from anywhere except WordPress
This is a basic security principle: minimize your attack surface. MariaDB uses 'wpuser'@'%' (allow from any host) because from its perspective, WordPress is a remote connection coming from another container IP — not localhost. But since port 3306 is never exposed outside the Docker network, @'%' is safe in practice.
NGINX, PHP-FPM, and FastCGI
NGINX cannot execute PHP on its own. When it receives a request for a .php file, it forwards it to PHP-FPM using the FastCGI protocol on port 9000. PHP-FPM runs the script and returns the HTML output to NGINX.
location ~ \.php$ {
fastcgi_pass wordpress:9000; # forward to WordPress container
include fastcgi_params;
fastcgi_param SCRIPT_FILENAME $document_root$fastcgi_script_name;
}
For static files (CSS, JS, images), NGINX serves them directly from the shared volume — no PHP needed.
WP_HOME vs WP_SITEURL
Both tell WordPress where it lives, but they serve different purposes:
WP_SITEURL— where WordPress core files are (the PHP code, wp-admin)WP_HOME— where your website is accessible to visitors
If these are not set correctly, WordPress redirects every request to the wrong URL. Always set both in wp-config.php or via WP-CLI:
wp config set WP_HOME "https://${DOMAIN_NAME}" --path=/var/www/html --allow-root
wp config set WP_SITEURL "https://${DOMAIN_NAME}" --path=/var/www/html --allow-root
3. Phase 0 — Do Everything Manually First
Goal: Install and configure all three services by hand on a Debian VM. Once the WordPress site works manually, you'll know exactly what your Dockerfiles need to do.
Step 1 — Prepare the VM
Install a fresh Debian 11 (Bullseye) VM in VirtualBox. Download the amd64 netinst ISO from:
https://www.debian.org/distrib/netinst
Then update the system:
sudo apt update && sudo apt upgrade -y
sudo apt install -y curl wget vim openssl
Step 2 — Install & Configure MariaDB
sudo apt install -y mariadb-server
sudo systemctl start mariadb
sudo mysql_secure_installation
# Connect as root and set up the database
sudo mysql -u root
Inside the MySQL shell:
CREATE DATABASE wordpress;
CREATE USER 'wpuser'@'localhost' IDENTIFIED BY 'wppassword';
GRANT ALL PRIVILEGES ON wordpress.* TO 'wpuser'@'localhost';
FLUSH PRIVILEGES;
EXIT;
Verify the user works:
mysql -u wpuser -pwppassword wordpress
Step 3 — Install & Configure PHP-FPM
sudo apt install -y php-fpm php-mysql
sudo systemctl start php-fpm
sudo systemctl status php-fpm
Step 4 — Install WordPress
cd /var/www/html
sudo wget https://wordpress.org/latest.tar.gz
sudo tar -xzf latest.tar.gz
sudo mv wordpress/* .
sudo chown -R www-data:www-data /var/www/html
sudo cp wp-config-sample.php wp-config.php
Edit wp-config.php and fill in:
define( 'DB_NAME', 'wordpress' );
define( 'DB_USER', 'wpuser' );
define( 'DB_PASSWORD', 'wppassword' );
define( 'DB_HOST', 'localhost' );
Step 5 — Install & Configure NGINX
sudo apt install -y nginx
Create /etc/nginx/sites-available/wordpress:
server {
listen 80;
server_name localhost;
root /var/www/html;
index index.php;
location / {
try_files $uri $uri/ /index.php?$args;
}
location ~ \.php$ {
include snippets/fastcgi-php.conf;
fastcgi_pass unix:/run/php/php-fpm.sock;
}
}
Enable the site:
sudo ln -s /etc/nginx/sites-available/wordpress /etc/nginx/sites-enabled/
sudo rm /etc/nginx/sites-enabled/default
sudo nginx -t
sudo systemctl reload nginx
Step 6 — Test HTTP First
Open a browser and go to http://localhost. You should see the WordPress setup page. Complete the installation, then verify you can log in at http://localhost/wp-admin.
Step 7 — Add TLS (HTTPS)
sudo mkdir -p /etc/nginx/ssl
sudo openssl req -x509 -nodes -days 365 -newkey rsa:2048 \
-keyout /etc/nginx/ssl/key.pem \
-out /etc/nginx/ssl/cert.pem \
-subj "/CN=localhost"
Update NGINX to use port 443 and TLS only:
server {
listen 443 ssl;
server_name localhost;
root /var/www/html;
index index.php;
ssl_certificate /etc/nginx/ssl/cert.pem;
ssl_certificate_key /etc/nginx/ssl/key.pem;
ssl_protocols TLSv1.2 TLSv1.3;
location / {
try_files $uri $uri/ /index.php?$args;
}
location ~ \.php$ {
include snippets/fastcgi-php.conf;
fastcgi_pass unix:/run/php/php-fpm.sock;
}
}
Reload NGINX, visit https://localhost, accept the browser warning, and confirm WordPress loads.
Step 8 — Verify Everything
sudo systemctl status mariadb # active
sudo systemctl status php-fpm # active
sudo systemctl status nginx # active
Visit https://localhost/wp-admin and log in. Create a test post to confirm the database is working.
Once all of this works manually — you're ready to containerize it.
4. Phase 1 — Your First Container (MariaDB)
Goal: Get MariaDB running in a Docker container, with the database and user created automatically on startup.
Folder Structure
inception/
└── srcs/
└── requirements/
└── mariadb/
├── Dockerfile
└── tools/
└── init.sh
Install Docker
sudo apt install -y docker.io
sudo systemctl start docker
Dockerfile
FROM debian:bullseye
RUN apt-get update && apt-get install -y mariadb-server \
&& rm -rf /var/lib/apt/lists/*
COPY tools/init.sh /init.sh
RUN chmod +x /init.sh
CMD ["/init.sh"]
init.sh
#!/bin/bash
mysqld_safe &
sleep 3
mysql -u root <<EOF
CREATE DATABASE IF NOT EXISTS wordpress;
CREATE USER IF NOT EXISTS 'wpuser'@'%' IDENTIFIED BY 'wppassword';
GRANT ALL PRIVILEGES ON wordpress.* TO 'wpuser'@'%';
FLUSH PRIVILEGES;
EOF
wait
Whymysqld_safe &and notservice mysql start? Containers have no systemd. You must start the binary directly. The&runs it in the background so the script can continue running setup commands.waitthen keeps the script alive watching the background process.
Why@'%'and not@'localhost'? In Docker, WordPress runs in a separate container. From MariaDB's view, that's a remote connection — not localhost.@'%'allows connections from any host, which is safe because port 3306 is never exposed outside the Docker network.
Build and Run
cd srcs/requirements/mariadb
docker build -t mariadb_test .
docker run -it mariadb_test
Verify
Open a second terminal:
docker exec -it <container_id> mysql -u wpuser -pwppassword wordpress
If you see a MySQL prompt — Phase 1 done.
5. Phase 2 — Add WordPress + PHP-FPM
Goal: Get WordPress running in its own container, connected to MariaDB over a Docker network.
Create the Docker Network
docker network create inception
Re-run MariaDB on the network:
docker stop <old_mariadb> && docker rm <old_mariadb>
docker run -d --name mariadb --network inception mariadb_test
WordPress Dockerfile
FROM debian:bullseye
RUN apt-get update && apt-get install -y \
php-fpm \
php-mysql \
wget \
curl \
&& rm -rf /var/lib/apt/lists/*
COPY tools/init.sh /init.sh
RUN chmod +x /init.sh
EXPOSE 9000
CMD ["/init.sh"]
WordPress init.sh
#!/bin/bash
# Download WordPress
wget -q https://wordpress.org/latest.tar.gz -P /tmp
tar -xzf /tmp/latest.tar.gz -C /tmp
mkdir -p /var/www/html
mv /tmp/wordpress/* /var/www/html/
# Download WP-CLI
curl -O https://raw.githubusercontent.com/wp-cli/builds/gh-pages/phar/wp-cli.phar
chmod +x wp-cli.phar
mv wp-cli.phar /usr/local/bin/wp
# Wait for MariaDB to be ready
sleep 5
# Create wp-config.php
wp config create \
--dbname=wordpress \
--dbuser=wpuser \
--dbpass=wppassword \
--dbhost=mariadb \
--path=/var/www/html \
--allow-root
# Install WordPress
wp core install \
--url=localhost \
--title="Inception" \
--admin_user=myadmin \
--admin_password=adminpass \
--admin_email=admin@example.com \
--path=/var/www/html \
--allow-root
# Create editor user
wp user create editor editor@example.com \
--role=editor \
--user_pass=editorpass \
--path=/var/www/html \
--allow-root
# Start PHP-FPM
mkdir -p /run/php
exec php-fpm7.4 -F
Build and Run
cd srcs/requirements/wordpress
docker build -t wordpress_test .
docker run -d --name wordpress --network inception wordpress_test
Verify
docker exec -it wordpress php -r "
\$c = new mysqli('mariadb', 'wpuser', 'wppassword', 'wordpress');
echo \$c->connect_error ? 'FAILED' : 'SUCCESS';
"
If you see SUCCESS — Phase 2 done.
6. Phase 3 — Add NGINX + TLS
Goal: NGINX in its own container with TLS, wired to WordPress. Visit https://localhost and see the WordPress site.Folder Structure
nginx/
├── Dockerfile
├── conf/
│ └── nginx.conf
└── tools/
└── init.sh
NGINX Dockerfile
FROM debian:bullseye
RUN apt-get update && apt-get install -y \
nginx \
openssl \
&& rm -rf /var/lib/apt/lists/*
COPY conf/nginx.conf /etc/nginx/sites-available/default
COPY tools/init.sh /init.sh
RUN chmod +x /init.sh
EXPOSE 443
CMD ["/init.sh"]
nginx.conf
server {
listen 443 ssl;
server_name localhost;
ssl_certificate /etc/nginx/ssl/cert.pem;
ssl_certificate_key /etc/nginx/ssl/key.pem;
ssl_protocols TLSv1.2 TLSv1.3;
root /var/www/html;
index index.php;
location / {
try_files $uri $uri/ /index.php?$args;
}
location ~ \.php$ {
fastcgi_pass wordpress:9000;
include fastcgi_params;
fastcgi_param SCRIPT_FILENAME $document_root$fastcgi_script_name;
}
}
NGINX init.sh
#!/bin/bash
mkdir -p /etc/nginx/ssl
openssl req -x509 -nodes -days 365 -newkey rsa:2048 \
-keyout /etc/nginx/ssl/key.pem \
-out /etc/nginx/ssl/cert.pem \
-subj "/CN=localhost"
exec nginx -g "daemon off;"
Build, Run, and Share a Volume
NGINX needs access to WordPress files to serve static assets. Create a shared volume:
docker volume create wp_files
# Restart WordPress with volume
docker stop wordpress && docker rm wordpress
docker run -d --name wordpress --network inception \
-v wp_files:/var/www/html wordpress_test
# Run NGINX with same volume
docker build -t nginx_test .
docker run -d --name nginx --network inception \
-p 443:443 \
-v wp_files:/var/www/html nginx_test
Visit https://localhost in your VM browser, accept the certificate warning — Phase 3 done.
7. Phase 4 — Wire Everything with Docker Compose
Goal: Replace all manualdocker runcommands with a singlemakecommand using Docker Compose.
Project Structure
inception/
├── Makefile
└── srcs/
├── .env
├── docker-compose.yml
└── requirements/
├── mariadb/
│ ├── Dockerfile
│ └── tools/init.sh
├── wordpress/
│ ├── Dockerfile
│ └── tools/init.sh
└── nginx/
├── Dockerfile
├── conf/nginx.conf
└── tools/init.sh
.env File
DOMAIN_NAME=localhost
MYSQL_DATABASE=wordpress
MYSQL_USER=wpuser
MYSQL_PASSWORD=wppassword
MYSQL_ROOT_PASSWORD=rootpassword
WP_TITLE=Inception
WP_ADMIN_USER=myadmin
WP_ADMIN_PASSWORD=adminpass
WP_ADMIN_EMAIL=admin@example.com
WP_USER=editor
WP_USER_PASSWORD=editorpass
WP_USER_EMAIL=editor@example.com
Never commit.envto git. Add it to.gitignore.
docker-compose.yml
version: '3'
services:
mariadb:
build: ./requirements/mariadb
container_name: mariadb
networks:
- inception
volumes:
- db_data:/var/lib/mysql
env_file:
- .env
restart: always
wordpress:
build: ./requirements/wordpress
container_name: wordpress
networks:
- inception
volumes:
- wp_files:/var/www/html
env_file:
- .env
depends_on:
- mariadb
restart: always
nginx:
build: ./requirements/nginx
container_name: nginx
networks:
- inception
volumes:
- wp_files:/var/www/html
ports:
- "443:443"
depends_on:
- wordpress
restart: always
networks:
inception:
driver: bridge
volumes:
db_data:
driver: local
wp_files:
driver: local
Update init.sh Files to Use Environment Variables
MariaDB init.sh:
#!/bin/bash
mysqld_safe &
until mysqladmin ping --silent; do
sleep 1
done
if ! mysql -u root -e "USE ${MYSQL_DATABASE};" 2>/dev/null; then
mysql -u root <<EOF
CREATE DATABASE IF NOT EXISTS ${MYSQL_DATABASE};
CREATE USER IF NOT EXISTS '${MYSQL_USER}'@'%' IDENTIFIED BY '${MYSQL_PASSWORD}';
GRANT ALL PRIVILEGES ON ${MYSQL_DATABASE}.* TO '${MYSQL_USER}'@'%';
ALTER USER 'root'@'localhost' IDENTIFIED BY '${MYSQL_ROOT_PASSWORD}';
FLUSH PRIVILEGES;
EOF
fi
mysqladmin -u root -p${MYSQL_ROOT_PASSWORD} shutdown
exec mysqld_safe
Theifblock only runs setup once — on first start when the database doesn't exist. On subsequent restarts it skips straight toexec mysqld_safe. This prevents the "Access denied for root" crash loop.
WordPress init.sh:
#!/bin/bash
until mysqladmin ping \
-h mariadb -u ${MYSQL_USER} -p${MYSQL_PASSWORD} --silent 2>/dev/null; do
echo "Waiting for MariaDB..."
sleep 1
done
if [ ! -f /var/www/html/wp-config.php ]; then
wp config create \
--dbname=${MYSQL_DATABASE} \
--dbuser=${MYSQL_USER} \
--dbpass=${MYSQL_PASSWORD} \
--dbhost=mariadb \
--path=/var/www/html \
--allow-root
wp config set WP_HOME "https://${DOMAIN_NAME}" --path=/var/www/html --allow-root
wp config set WP_SITEURL "https://${DOMAIN_NAME}" --path=/var/www/html --allow-root
wp core install \
--url=${DOMAIN_NAME} \
--title=${WP_TITLE} \
--admin_user=${WP_ADMIN_USER} \
--admin_password=${WP_ADMIN_PASSWORD} \
--admin_email=${WP_ADMIN_EMAIL} \
--path=/var/www/html \
--allow-root
wp user create ${WP_USER} ${WP_USER_EMAIL} \
--role=editor \
--user_pass=${WP_USER_PASSWORD} \
--path=/var/www/html \
--allow-root
fi
mkdir -p /run/php
exec php-fpm7.4 -F
Makefile
all:
docker-compose -f srcs/docker-compose.yml up --build
down:
docker-compose -f srcs/docker-compose.yml down
re: down all
clean: down
docker system prune -af
fclean: clean
docker volume rm $$(docker volume ls -q)
Run It
make
Visit https://localhost — Phase 4 done.
8. Phase 5 — Make It Subject Compliant
Goal: Clean everything up to match exactly what the 42 subject requires.
1. Fix the Domain Name
Replace localhost with login.42.fr (use your 42 username):
echo "127.0.0.1 login.42.fr" | sudo tee -a /etc/hosts
Update .env:
DOMAIN_NAME=login.42.fr
2. Fix Volume Paths (Bind Mounts)
The subject requires volumes stored at /home/login/data/:
mkdir -p /home/login/data/wordpress
mkdir -p /home/login/data/mariadb
Update docker-compose.yml volumes:
volumes:
db_data:
driver: local
driver_opts:
type: none
o: bind
device: /home/login/data/mariadb
wp_files:
driver: local
driver_opts:
type: none
o: bind
device: /home/login/data/wordpress
3. NGINX — TLS Only
- No port 80 listener
- Only TLSv1.2 and TLSv1.3:
ssl_protocols TLSv1.2 TLSv1.3;
4. Container Rules
Every service in docker-compose.yml must have:
restart: always
No privileged: true, no --link, no network_mode: host.
5. WordPress Users
The subject requires:
- One admin user — username must NOT contain
adminoradministrator - One regular user (editor, author, or subscriber role)
Check your .env — rename WP_ADMIN_USER if it contains "admin".
6. Containers Must Use exec to Run Services
Every container must end with exec so the service runs as PID 1:
exec php-fpm7.4 -F # wordpress
exec mysqld_safe # mariadb
exec nginx -g "daemon off;" # nginx
No infinite loops (while true; do sleep 1; done), no sleep infinity, no tail -f /dev/null as the main process.
7. Clean Up Dockerfiles
- Start with
FROM debian:bullseye— no pre-built service images - Add
&& rm -rf /var/lib/apt/lists/*after everyapt-get install - No hardcoded passwords — use environment variables only
8. Secure the .env File
echo ".env" >> .gitignore
9. Final Test
make fclean
make
Then verify:
https://login.42.frloads WordPress ✅https://login.42.fr/wp-adminlets you log in ✅- Both users exist and can log in ✅
docker psshows 3 running containers ✅docker volume lsshows 2 volumes ✅docker network lsshows the inception network ✅
9. Common Errors & Fixes
Access denied for user 'root'@'localhost' (using password: NO)
Cause: A root password was set in a previous run and is now stuck in the volume. On restart, the script tries to connect as root without a password.
Fix:
make fclean
docker volume rm $(docker volume ls -q)
make
Also make sure your MariaDB init.sh uses an if check to only run setup once (see Phase 4).
ERROR 2002: Can't connect to local MySQL server through socket
Cause: MariaDB didn't start properly inside the container.
Fix: Replace service mysql start with:
mysqld_safe &
sleep 3
unable to bind listening socket for address '/run/php/php7.4-fpm.sock'
Cause: The /run/php/ directory doesn't exist inside the container.
Fix: Add before starting PHP-FPM:
mkdir -p /run/php
Database connection error (2002) Connection refused
Cause: WordPress container starts before MariaDB is fully ready, or MariaDB is only binding to 127.0.0.1.
Fix 1 — Wait for MariaDB in WordPress init.sh:
until mysqladmin ping -h mariadb -u ${MYSQL_USER} -p${MYSQL_PASSWORD} --silent 2>/dev/null; do
sleep 1
done
Fix 2 — Make MariaDB listen on all interfaces:
RUN sed -i 's/bind-address\s*=\s*127.0.0.1/bind-address = 0.0.0.0/' \
/etc/mysql/mariadb.conf.d/50-server.cnf
WordPress Keeps Redirecting to Wrong URL
Cause: WP_HOME and WP_SITEURL are not set, so WordPress uses the URL from the database which doesn't include your port or domain.
Fix: Add after wp config create:
wp config set WP_HOME "https://${DOMAIN_NAME}" --path=/var/www/html --allow-root
wp config set WP_SITEURL "https://${DOMAIN_NAME}" --path=/var/www/html --allow-root
Container Exits Immediately (code 1 or 78)
Cause: A command in init.sh failed and the script exited.
Fix: Check the logs:
docker logs <container_id>
The last error message in the log is where the script failed.
wordpress container fails because MariaDB isn't ready
Cause: depends_on in Docker Compose only waits for the container to start, not for the service inside it to be ready.
Fix: Use a wait loop in WordPress init.sh (see above). depends_on is not enough on its own.
10. Final Checklist
Containers
- [ ] 3 containers: nginx, wordpress, mariadb
- [ ] Each container runs exactly one service
- [ ]
restart: alwayson all containers - [ ] Every container ends with
exec(PID 1) - [ ] No
tail -f /dev/null, no infinite loops as main process - [ ] No pre-built service images (only
FROM debian:bullseye)
NGINX
- [ ] Listens on port 443 only (no port 80)
- [ ] TLSv1.2 and TLSv1.3 only
- [ ] Self-signed certificate generated inside container
- [ ] Only NGINX has an exposed port
WordPress
- [ ] Two users: one admin, one editor/author/subscriber
- [ ] Admin username does NOT contain "admin" or "administrator"
- [ ]
wp-config.phpuses environment variables - [ ]
WP_HOMEandWP_SITEURLare set correctly
MariaDB
- [ ] Database and user created automatically on first start
- [ ] Root password set from environment variable
- [ ] Listens on
0.0.0.0(not just127.0.0.1) - [ ] Setup only runs once (idempotent init script)
Docker Compose & Volumes
- [ ] Single
docker-compose.ymlinsrcs/ - [ ] Custom bridge network named
inception - [ ] 2 volumes: wordpress files and database data
- [ ] Volumes bind-mounted at
/home/login/data/ - [ ]
.envfile used for all secrets - [ ]
.envis in.gitignore
Domain
- [ ]
DOMAIN_NAME=login.42.frin.env(your 42 login) - [ ]
127.0.0.1 login.42.frin/etc/hostson the VM - [ ]
https://login.42.frloads WordPress - [ ]
https://login.42.fr/wp-adminlogin works
Makefile
- [ ]
makebuilds and starts everything - [ ]
make downstops everything - [ ]
make fcleanremoves containers, images, and volumes - [ ]
make redoes a full clean rebuild
11. Useful Links
Official Documentation
- Docker Documentation — everything about Docker
- Docker Compose Reference — all docker-compose.yml options
- NGINX Documentation — NGINX config reference
- MariaDB Documentation — MariaDB reference
- WordPress Developer Docs — WordPress internals
- WP-CLI Commands — all WP-CLI commands
Tools & Downloads
- Debian 11 (Bullseye) ISO — download the
amd64netinst ISO - VirtualBox — VM software
- OpenSSL — TLS certificate generation
Learning Resources
- Play with Docker — free browser-based Docker playground
- Docker — Getting Started — official beginner guide
- NGINX Beginner's Guide — learn NGINX config from scratch
Final tip: If something breaks, the first thing to always do is docker logs <container_name>. The answer is almost always in the logs. Good luck — and remember: containers are just processes wearing a disguise. 🐳